Speaker Placement and Acoustic Environment Effects
on Nearfield Monitor Systems –
MIX Magazine
To Woof Or Not To Woof? A SUBstantial Question – MIX Magazine
Optimizing the Studio Listening Environment – MIX Magazine
Acoustic Solutions, The RPG B.A.S.S. Trap – MIX Magazine
Examining the Yamaha NS-10M “Tissue Paper
Phenomenon” –
Recording Engineer/Producer Magazine
Sound Advice 1 – Modern Home Theater
Sound Advice 2 – Modern Home Theater
Sound Advice 3 – Modern Home Theater
Sound Advice 4 – Modern Home Theater
Sound Advice 5 – Modern Home Theater
Sound Advice 6 – Modern Home Theater
Sound Advice 7 – Modern Home Theater
Educational Resources
Articles written either for MIX
Magazine or Recording Engineer/
Producer Magazine or Modern
Home Theater.
– by Bob Hodas
Gain insights into studio listening environments and rooms.
Sound Advice 2
Modern Home Theater, May 2003 – by Bob Hodas
Substitute “she” where applicable. So, when we last left our hero he had moved his speakers all over the room until he found the spot where they sounded best. And when finished he realized that he had improved his room more than buying any new piece of gear could have. I know it’s a daunting task and some of you are probably still procrastinating. That’s okay because you can’t give all of the necessary information in just one article. There’s more help this month. For instance, did I remember to tell you it would be much easier if you removed those speaker spikes first? No? Shame on me! Those spikes will have an audible effect on the low end but you don’t need them for the initial placement. Even with my high resolution gear, I can’t measure any difference in frequency, phase or coherence with or without spikes. What we are trying to achieve is contiguous linear bass and you can do that sliding speakers on the floor.
I know if you care about this stuff enough to read this article, you’ve probably already read a bunch of other articles about room modes. Everybody’s got modes. Even the guys who angled their side walls. It’s just the laws of physics. And you probably already applied some of that mode info you gathered when you first set up your room. It’s certainly a good place to start. So let’s not beat a dead horse, but let’s talk about an aspect that rarely gets mentioned. The room mode charts are based on some assumptions that won’t always apply to your room.
First and foremost, the assumption is made that your room is infinitely contained i.e. a concrete bunker. The less contained a room is, the more low frequencies will pass through the walls. Of course you will be subject to the first peaks and dips of the wavelength, but some of these frequencies (starting with the lowest) are going to pass right through walls and windows and just keep on going. These wavelengths that escape are not going to bounce back into the listening area out of phase to haunt you (cancellations). It all depends on how stiff and dense your walls are. Some studio designers even use this idea to let some of the bass escape so that they can control it. Now, this doesn’t work too well if you have neighbors who are getting all the bass you just let out of your house without a license. Or maybe you need the isolation from your neighbors or airplanes. Another factor is, that depending on how your walls are built, they may vibrate and absorb some of the frequencies. Studio designers also use this technique although I feel the safest bet is to build your walls as stiff as possible so they don’t flex. You can always add some membrane absorbers placed strategically once the room is scoped out (future article).
The charts also assume that the speaker is against the front wall. This works for many home theaters but obviously not all. Here we apply the knowledge acquired last month. The distance from the walls is going to determine reflections that will mix in with the direct signal either in or out of phase, causing dips or peaks in the response. So the seating placement determined by the mode chart isn’t necessarily the right spot to put that chair. And don’t forget that you must have parallel walls and floor/ceiling. No cut off corners, no L shapes, no angles, no wet bar along the side wall, no open walkway into the next room. Didn’t those other articles make it sound so simple. Once again, shame on me.
Now if your room has parallel walls, your speakers are on the front wall and your theater is in the basement or just very well built then there is merit to the charts. You might want to check out the mode calculator created by Dan Siefert with One on One Technical Products (fig. 1). This is an easy to use, handy, accurate calculator. It’s an Excel file so make sure you have Excel on your computer. You can get this calculator from: Harman.com.
There is another tool that I think is very helpful and accurate. It is a tool that I personally use in my consultations and design. It is a $100 program called Room Optimizer by RPG (Windows only). At this time I think it’s ethical to tell you that I am an RPG dealer. Of course I’m also a dealer for most acoustical treatment companies, so I have the ability to pick and choose which products I think work well, and which are not appropriate for a job. So while I may have some biases or preferences, I want you to know that there will never be any hidden agendas in this article. If I tell you about a product, it is because I have used it successfully in many projects and have the measurements to back up its effectiveness. While I am happy to sell a product, I am not in the business of selling products, I make my money selling my services.
Room Optimizer is a very effective and informative program. It combines image model and multi dimensional optimization techniques to determine the best listener and loudspeaker locations. It simultaneously optimizes the SBIR (speaker boundary interference response) and modal coupling to produce the flattest bass response (fig 2). It also identifies locations of mid and high frequency first order reflections and gives you both absorptive and diffusive suggestions for treating them (fig 3). You can print out a graphic display of the optimized positions (fig 4) along with all of the numerical data.
The program does predictions for stereo systems with one or two woofers per cabinet. Surround systems can be full range with matching speakers or small speakers with bass management and dipole surrounds. You can do subwoofer placement as well. The math behind this program is deep and there will be some learning curve on your part in order to get the most accurate prediction possible. There are many input variables available to the user and results will be determined by what limits you put on the positions. But results can be extremely satisfying. A set up wizard is available to help guide you through the process until you know your way around. There are also examples of different configurations that will help guide you as well.
I often compare my direct measurement results with RPG’s calculations and have to say that the program is most often very close. I usually only make minor changes to predicted positions in order to fine-tune the system. I do want to be very clear that while Room Optimizer works quite well in theory, it is not foolproof. Like the mode programs, the program is based on perfectly symmetrical rooms with walls that do not flex or pass signal through them. There are times when, due to construction, furniture etc. the program doesn’t get the job done and an analyzer or your ears are needed. Remember that everything must be confirmed by the ears.
Okay, so call me a liar. I know some of you have tuned in because I said that I would talk about speaker set up in non-symmetrical rooms this time. But I really wasn’t finished with the symmetrical thing. Sorry, we will do it next time.
Figures:
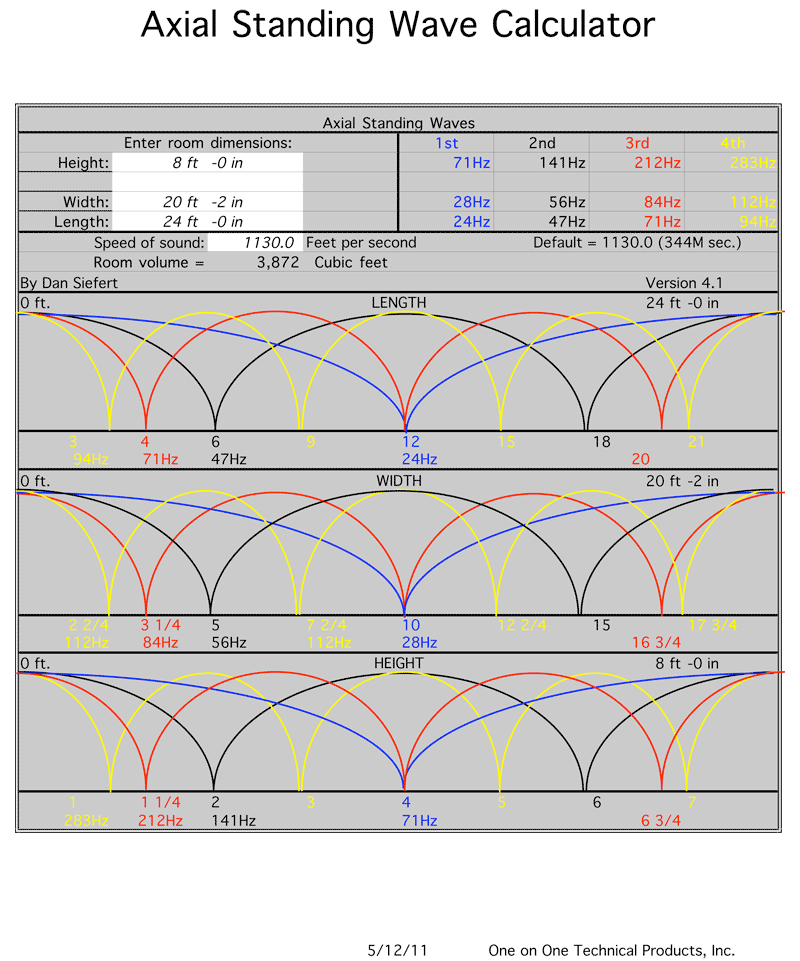
Fig. 1 Mode program display

Fig. 2 Spectral view
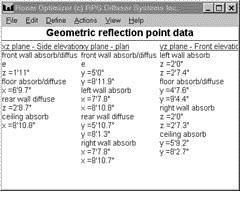
Fig. 3 First order reflection data
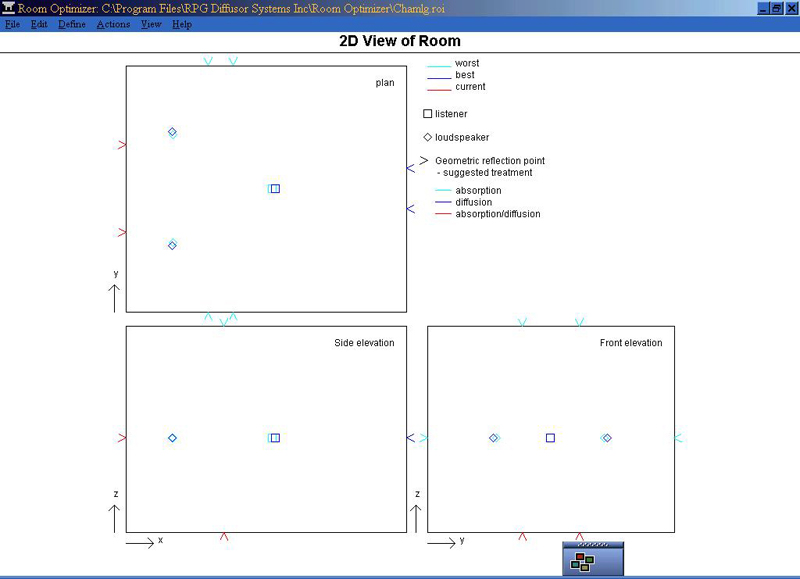
Fig. 4 Graphic display of optimized speaker, listening, and treatment positions